Tag: RMP (Page 1 of 5)

Changing Fixed Ammonia Detectors: Does it need an MOC?

There are a lot of choices out there for fixed Ammonia Detection these days. Common brands include CTI, Manning / Honeywell, Danfoss, Bacharach, Draeger, Hansen, and CoolAir.

Obviously if you are installing a new detector in a General Duty or PSM/RMP covered process, you want to perform an equipment-level PSSR (pre-Startup Safety Review) for the detector. However, a common question we get is “does changing from one brand to another require an MOC?

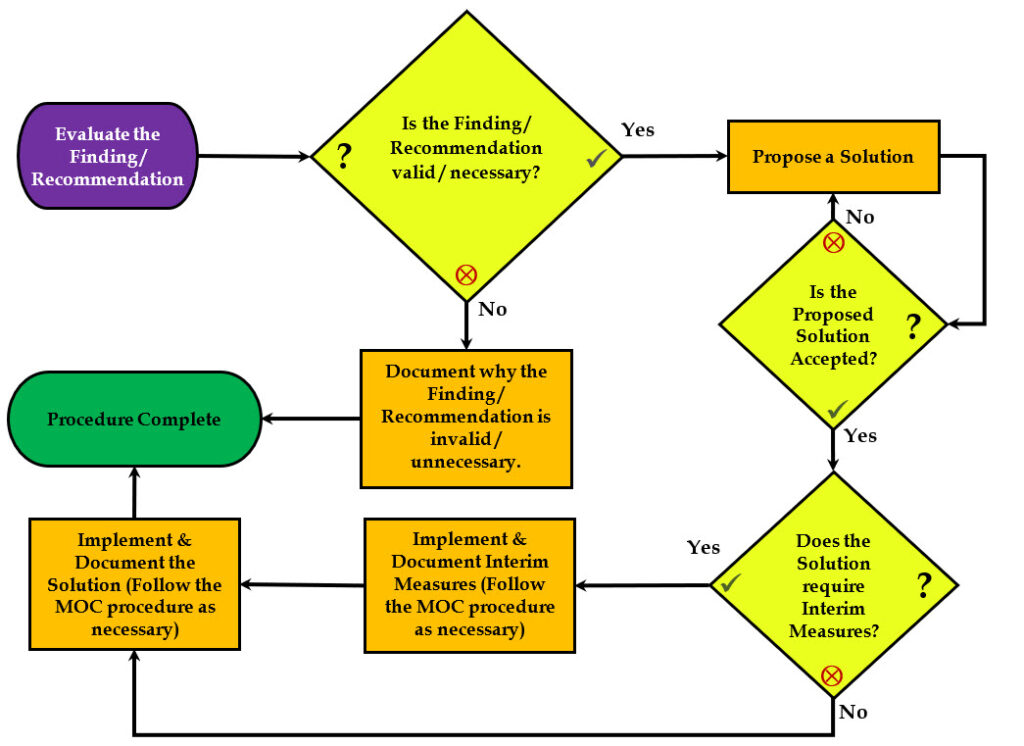
The root of this question is usually an attempt to justify the “change” as a “Replacement in Kind” and therefore avoid the paperwork of an MOC. But an MOC is not about PAPERWORK. An MOC is about thinking through the desired change (in a structured way) to see where problems can arise.

Put another way: Implementing the MOC procedure is how we answer the question of whether or not we need to document how we manage the change.

Let’s consider some things that might change when we replace one detector brand for another.

  • Sensor Type.
  • Sensor Range.
  • Signal Type / Range.
  • Enclosure Rating / Environmental Considerations.
  • Detector Placement.
  • Inspections, Tests & Maintenance.
  • Bump Tests / Calibrations.

Sensor Type: Electrochemical, IR, Catalytic Bead, etc. Each of these types of sensors has benefits and drawbacks based on the conditions they are used for and in. If you are changing technologies, how does that change affect your process?  

Sensor Range: Obviously the range of the sensor has an impact on how it works in your system. Replacing a 1-500ppm sensor with a 1-250ppm sensor without altering the system programming will report the wrong chemical concentration.

Signal Type / Range: Most sensor setups work on a 4-20mA signal, but some use Modbus or proprietary methods. You need to match your technologies or provide signal conversation.

Enclosure Rating / Environmental Considerations: Some sensors are subject to difficult environmental conditions such as blast-freezers and wash-down areas. You need to make sure that the sensor is suitable for the conditions you will expose it to.

Detector Placement: Manufacturer’s often provide recommendations on the height they want their detectors placed at. Make sure you are addressing those recommendations. If you are moving the Detector, are there any guarding considerations in the new location?

Inspections, Tests & Maintenance: Manufacturers have different inspections, tests and maintenance types and schedules. You must make sure you align to the manufacturers recommendations.

Bump Tests / Calibrations: Both the calibration method & frequency must be considered, including any unique calibration equipment and gases.

Conclusion: So, it’s possible that swapping a detector might well be a “Replacement in Kind” but there are a lot of things to consider before you arrive at that decision. You should use your MOC process to see if you need a formal, documented MOC.

The EPA has made a relatively small update to the process of submitting, updating, or correcting your RMP filing. The change is minor, but if not accounted for, it can slow down or stop your filing process.

What Changed?

  1. The facility’s Certifier (Certifying Official) is required to complete an “identity proofing” process.
  2. The Certifier must sign an electronic signature agreement (ESA) through the CDX portal.
  3. Electronic signature agreements are no longer required within RMP*eSubmit.

It has always been a requirement for the Certifier (and Preparers) to have profiles established through the CDX portal, but the identity proofing and CDX Electronic Signature Agreement (ESA) components are new.

It’s possible that this identity proofing and signature agreement are already taken care of, but it would still be prudent to ensure your Certifier has met these requirements several weeks before your RMP submittal/update are due.

Who is Affected?

The Certifying Official for your process’s RMP filing is the only one affected. The EPA defines these people as:

Certifiers are facility owners or operators who must certify the accuracy and completeness of the information reported in the RMP. They have signed and submitted a one-time Electronic Signature Agreement (ESA) to the EPA. The ESA legally binds the Certifier’s electronic submission to their signature. Only Certifiers can submit the RMP.”

This is usually a plant manager, owner, or some other member of upper management. In order to be respectful of their time, it would be good to let them work through these new requirements well before the filing is due.

If you believe that your Certifier has already met these requirements, here is what the EPA’s guidance suggests to verify:

”Some existing users may not be impacted if they previously completed identity proofing and signed a standard CDX ESA for another program service that uses the same CDX organization as their RMP*eSubmit Certifying Official role.

Existing Users who Registered Before February 24, 2023
Existing users who have not verified their identity or without a standard CDX ESA will be prompted to complete identity verification and ESA when they access the RMP*eSubmit for the first time. The one-time process can be initiated by logging into CDX and clicking on the “Certify Submission” role link. Users will be able to complete this process using one of the below methods:

  1. Electronically – fastest method
    1. Verify identity using LexisNexis.
    2. If you pass verification, electronically sign the standard CDX ESA.
  2. Paper process – if you opt out of or fail the limited LexisNexis identity verification attempts
    1. Click “Paper Verification” option.
    2. Print the standard CDX ESA – the Status for the role will change to “Awaiting ESA Approval” on the MyCDX page.
    3. Sign the paper ESA with wet ink.
    4. Mail all pages of the ESA to the RMP Reporting Center (address located on the last page of the ESA).
    5. The RMP Reporting Center will verify ESA information and activate the role if appropriate.

Once the above electronic or paper process is complete, you will be able to access RMP*eSubmit.”

The EPA’s RMP eSubmit User Manual has more information, and detailed step-by-step instructions for any CDX portal or RMP filing questions you may have. (Link functional as of June, 2023)

As always, we will continue to track any changes we can find concerning Ammonia Refrigeration process safety. Any changes or updates will be posted here and accounted for in the OSPSM compliance templates. If you have questions or would like to find out more, please contact the RC&E Safety and Compliance team ([email protected]).

EPA Proposes to change the RMP rules (again)

Looks like the Biden administration is going to continue the recent streak of attempting to change the EPA RMP rules that was started in the Obama administration.

Risk Management Program Safer Communities by Chemical Accident Prevention Proposed Rule

On August 18, 2022, EPA Administrator Michael S. Regan signed the Safer Communities by Chemical Accident Prevention (SCCAP) rule, which proposes revisions to the Risk Management Program (RMP) to further protect vulnerable communities from chemical accidents, especially those living near facilities with high accident rates. The proposed rule would strengthen the existing program and includes new safeguards that have not been addressed in prior RMP rules. Some of the proposed requirements include identifying safer technologies and chemical alternatives, more thorough incident investigations, and third-party auditing, all of which should benefit nearby communities. When finalized, the rule is expected to make communities safer by reducing the frequency of chemical releases and their adverse effects.

The public may comment on the SCCAP proposed rule at www.regulations.govEXIT EPA WEBSITE (Docket ID No.: EPA-HQ-OLEM-2022-0174) until 60 days after publication in the Federal Register.

View the Prepublication Version of the Federal Register Notice for the RMP Safer Communities by Chemical Accident Prevention Proposed Rule (pdf) (2.2 MB)

Note: This previous post covers the history over the past 3 presidential administrations.

Can long Lead Times impact Process Safety?


“Time Waits for No one…”

The Issue at hand

When I first started in NH3 refrigeration, you could pick up the phone, talk to your parts-guy, and get a replacement valve quickly: often the same day, but usually within a business day or two. While you were waiting for the part, you either operated the equipment manually (requiring a temporary SOP / MOC) or shut the equipment down during the wait. We call the time between when you order something and when it arrives, lead-time.

Because lead-times *were* short, parts inventory at most facilities were kept fairly low – usually limited to what would stop production. If you could get what you needed in a day or two, why keep it on the shelf, unless you were losing 20k+ an hour in downtime?

The situation has changed around us, and I’m not sure we’ve all thought through the implications of the current supply-chain issues. Lead-times have grown substantially in 2021 and, while relief is promised in the second half of 2022, these long wait times for equipment and components have the potential to adversely affect our Process Safety.


Current Lead Time estimates

Equipment / Component Lead-Times in Weeks*
Valves, Shutoff and Control 14-24
Valves, Relief 12-20
Vessels 14-24
Condensers 14-16
Compressors 16
Air Unit / Evaporators 36
Heat Exchangers 14

*Typical for NH3 components. Varies by brand. Some halocarbons lead-times are even longer.


How can this affect Process Safety?

When you don’t have a critical spare part, and won’t have one for several months, production demands are likely to force you to operate your equipment in “temporary” modes. Here are a few thoughts:

  • Temporary is a vague term, but we don’t normally think of temporary as “weeks” or “months”. Put this in more personal terms: if your city tells you they are working on a water main and you will be without water for 8hrs, your response is quite different than if you are going to be without water for 3 months. Not having running water for a few hours means you pour some in a pitcher and delay some dish washing / bathing. Not having water for months requires an entirely different approach.
  • It is very likely that the PSM element where you “identify hazards and control them” (the PHA) was based on customary lead-times, not the ones we are now facing!
  • If operating in a temporary mode has negative safety implications, it is far easier to make the argument that we should forgo production for a few hours, or that we can handle manual operations for a few hours, than it is to justify these “temporary” arrangements for several weeks or months. As an example, if an automatic makeup feed valve to a vessel fails, it’s not terribly difficult to manually manage that for a few hour manually while your parts provider gets you the new valve. It’s far more difficult to manage that issue around the clock for several weeks or months!


What should I do?

“The first responsibility of a leader is to define reality…” –Max DePree

Well, the first step is to start a discussion with your skilled technicians and make sure they understand the environment we’re all working in. Here are some points for discussion, and further actions to take:

  • Get a good understanding of the lead-times for the replacement components in your system.
  • With that understanding, talk with your skilled technicians about what is critical for operations.
  • Discuss what you’ve learned so far with operations / production management so you can understand what they “need” and they have a better understanding of these issues.
  • Review your PHA (with all the above in mind) to see what (if any) changes you might need to make to your spare parts/equipment inventory. You might want to bias towards a higher on-site inventory, and (especially if you are using a CMMS or other parts control software) increase your “minimum” inventory to 1 or 2, rather than zero.
  • Order what you need.
  • Consider pre-writing some “temporary” SOPs for operations when failures of critical components occur.

RC&E can assist you with your parts and spares. Click Here for our Line Card. Call Dennis Vaught 817-210-1957 or email him at [email protected]

Ammonia Process Safety below 10,000 pounds

One of the most frequent misconceptions we’ve been dealing with in our industry is a belief that being below the PSM/RMP threshold means you are in some sort of wild-west no-man’s-land where there are no rules. Previously we’ve dealt with that issue in a post called “General Duty vs. PSM/RMP: Is there a benefit to dropping below the 10,000lb threshold?” But that post was really written to people that were considering lowering their NH3 inventory to avoid regulation.

We thought it would be useful to put together an article that dealt with those systems that were already under the PSM/RMP threshold so they better understood the Safety & Regulatory landscape. To that end, we’ve put the information in a executive level 3-page pdf that is easy to email: Ammonia Process Safety below 10k

Email or call us today to have RC&E assist you with all your PSM/RM Program needs! [email protected]    (888) 357-COOL (2665)

Updated IIAR 2-2021 Standard Released

IIAR 2 – 2021 Standard for Design of Safe Closed-Circuit Ammonia Refrigeration Systems has been released by the IIAR and is now available for purchase on their website

The updated standard has several new requirements which resulted in some changes in the PSM/RMP program templates. Here are some of the highlights:

  1. The definitions file was updated with new IIAR 2 definitions. Added in-document headings to skip around the document easily.
  2. The PHA Checklist Template was updated to the new IIAR 2:
    • Added a note that “Provisions for plugs or caps required under IIAR 2 5.9.3.3” on all oil draining plug/cap questions.
    • Added a note that “IIAR 2-2021 5.12.2 requires a check valve during charging” in relevant Charging SOP section.
    • Added a question on Provisions for Pumpout per IIAR 2-2021 5.12.6 on PV1 subsection and all Equipment Subsections.
    • Added/Modified questions on RC1 section about low ambient temperature, and VFD resonance.
    • Added a question on EV2 (Liquid Heat Exchanger) equipment subsection regarding secondary coolant side pressure ratings.
    • Added a question on MR.C Checklist for Classified Space signage.
    • Added a question on PV1 (Piping & Valves) on new MOPD & MSSPD requirements for valves leading to atmosphere.
    • Added a question on PV1 (Piping & Valves) on requirements for unique identification for Emergency Shutoff valves.
    • Modified existing .PSV equipment sub-subsections to include IIAR 2 2021 15.2.6 requirement that liquid relieving reliefs relieve back into the system.
    • Added a note that IIAR 2 2021 13.2.3.1.1 limits carbon steel tubing and carbon steel compression fittings to valve sensing pilots, compressors, compressor packages, and packaged systems to all small-bore piping / tubing questions.
    • Updated MR.C section for new requirements regarding NH3 detection.
    • Updated various checklists (VENT, DET, PSV, DT) to match current IIAR 2-2021 text.
    • Added a new equipment subsection NMR.C for IIAR 2 Equipment located outside of Machinery rooms.
    • Added a new equipment subsection PKG.C for IIAR 2 Packaged Systems and Equipment.
    • Added a new equipment subsection IAC.C for IIAR 2 Instrumentation Controls.
  3. Updated “Contractor Door Sign” to meet new IIAR 2 – 2021 [5.14.1.1] information standards and some ASHRAE 15 – 2019 [11.2.1] standards.

Comments about the changes and the required steps to implement the document changes are present in the “Change Log and Reference” document at 08/02/21.

…Read on further in this post if you want to know about the changes in the new IIAR 2…


Continue reading

Justifying the Ammonia delivery?

The issue: A facility with an ammonia refrigeration system notes that their HPR level is rather low, and they are considering ordering some ammonia to get back to the levels they “used to have.” The thinking is that they need to add to the ammonia charge to make up for ammonia that was lost over the years.

Before you go too far, a good question to ask is: Did I lose ammonia? Or is it just somewhere else in my system?


What if you didn’t lose it?

Did you add equipment without your MOC addressing if this required an inventory adjustment? Did you change recirculator vessel levels which make the HPR look low even though the ammonia is still out in the system? Has someone been mucking with the HXV’s or TXV’s, so you are “brining” coils? These are common issues, but the most likely culprit is seasonal variation.

If it’s August in Texas, it’s likely that your system is running about as hard as it will ever run. That means that the NH3 isn’t just hanging out in your vessels, but out in the various heat exchangers (and their piping) doing its job. The “good old boy” method of testing this was to wait until the cool of the night, shut down the liquid feed to your “load,” and check the vessel levels after the NH3 came back.

A more “modern” method is to use an inventory spreadsheet and adjust the levels in the heat exchangers to reflect the summer load. The intricacies of doing either of these are better dealt with in the real world rather than a blog-post, so let’s assume you have already checked this and you actually do need ammonia. (Note: if you need assistance with either of the above, we can certainly assist you, just give us a call)


Ok, maybe we did lose it!

If you look into the situation and find out that you actually do need ammonia, there are a few considerations you should think of BEFORE you order that truck and start preparing for delivery.

  • Figure out how much. Use an inventory spreadsheet (or have an engineer do it for you) to figure out how much ammonia you need to get back to your “normal” level.
  • Review your charging SOP with the refrigeration team to make sure you are all on the same page. This isn’t something you should be doing often so take this opportunity to review, validate, and TRAIN on this procedure.
  • Document where you think that ammonia went! For most facilities this is just calculating your “leak” rate. This is your “justification” that you are replacing lost ammonia, not adding to your intended inventory level.


Justifying the charge

Assuming you didn’t have some sort of incident that clearly explains why you need ammonia, we should figure out how to justify the amount we’re adding. Most losses are easily justified by establishing a “loss rate” and comparing it to accepted norms. This acceptable loss would be caused by normal maintenance, auto-purgers, and fugitive emissions.

In my opinion, anything less than 5% is good. 2-3% is excellent. For what it’s worth, the IIAR has stated that up to 10% loss a year is “reasonable.”

A loss rate of 3% or less a year can easily be explained from normal maintenance, auto-purgers, and fugitive emissions.

This is easier to explain with a worked example from a friend. In this case, their inventory level is supposed to be 5,800lbs. When they updated their inventory sheet to reflect the actual conditions at the facility, they saw a calculated current charge of 5,000lbs reflecting an 800 pound loss. That loss occurred since their last charge 5 years ago.

This percentage is easily explainable from maintenance and other fugitive emissions, and it’s also quite reasonable.

If you take the time to figure out the math above, and then document your calculations to justify your NH3 charge, it helps avoid unpleasant assumptions on the part of the EPA and OSHA in any future inspections.

If an auditor comes in and sees an ammonia delivery receipt, a documented rationale why the ammonia was needed, the SDS of the chemical charged, and you have a compliant charging procedure, it would be very unlikely that the charging process would be questioned further.

Of course, if your math shows a high leak rate, then you had better get an incident investigation going and figure out what’s wrong!


P.S. – To assist in this effort, Scott updated the Ammonia Inventory example template has been updated to help automate this process. Just enter the old value, newly measured value, and time (in months) since last charging and you have a 1-page report on the % loss per year. We hope this helps. The file can be located at: \ PSM-RMP Program Templates \ 03 – Process Safety Information \ Optional Resources \

PHA Synergy: How to get more out of the PHA process

According to 1910.119(e) and 40CFR68.67(a) the purpose of a PHA is to “…identify, evaluate, and control the hazards involved in the process.” Since the mid-90’s the refrigeration industry has done this mainly through the IIAR’s “What-If” methodology as suggested in their Compliance Guidelines materials.

There have been many revisions of this material over the years, but they all have the same thing in common as you use them: You can see how each question / item:

  • Poses a failure scenario (sort of a lesson someone else has already learned)
  • Prods you to solve the issue through an existing RAGAGEP

For example, a question might ask something like “What if plugs, caps, or blind flanges are missing on purge or drain valves?” This should prod you to recall that both IIAR 2 and IIAR 4 require that these things be plugged, capped, etc. This should also prod you to ask how you are addressing this requirement in your Process Safety Program.

The issue we always came across is that you must KNOW or MEMORIZE what the RAGAGEP says in a very complete way, or you miss the connection between the “What If” scenario and the RAGAGEP. This is nearly impossible because it seems like RAGAGEP is multiplying at an alarming rate. Furthermore, this (at least two day) process often feels like a futile effort at figuring out what the “What-If” scenario questions are really getting at.

To improve this years ago, I started adding two things to the IIAR standard questions:

  1. References to the IIAR standards where appropriate. (For example, in our plug question, reference IIAR 2-2021 13.3.2.6 & IIAR 4-2020 10.4.5.4)
  2. Explicit checklists that allow you to compare your system to appropriate RAGAGEP outside of the “What If” scenarios.


It’s very easy to lose sight of evolving RAGAGEP over time. These checklists allow you to perform a forensic examination of your system compared to current RAGAGEP. In addition to the issue of improving RAGAGEP compliance, we also face other challenges.

  1. It is common to show up to perform a PHA and find the client lacks critical Process Safety Information and PSM elements & procedures making a compliant PHA extremely difficult or impossible.
  2. Incident Investigations are often in a state of disarray or incomplete making their inclusion in the PHA difficult at best, and almost meaningless at worst.
  3. IIAR 9 now requires an evaluation against its minimum requirements for all NH3 refrigeration systems at least every five years.
  4. In some regions the EPA has an almost absurd number of questions they “like” to see in your Facility Siting sections.
  5. The Emergency Action Plan is a critical safeguard in your program, and it is usually missing some basic items that aren’t apparent until you try and use it in an emergency.
  6. Finally, the IIAR has standards on Installation, Commissioning, and Decommissioning that are often overlooked.


This again leads us back to checklists. I created them for basic PSI & PSM items, Incident Investigations, IIAR 9, Facility Siting, EAP, IIAR 4, IIAR 6, and IIAR 8. Here’s what that looks like:

As you can see, that’s fairly comprehensive, but it’s also a lot more work! To adjust to all this, we usually perform PHA’s in a two-step process.

Step 1: Weeks in advance, we give the client the relevant checklists and have them fill them out to the best of their ability.

Step 2*: Once we’re on-site, we go over the checklists they’ve worked on to answer any questions, address discrepancies, etc. THEN we move on to the “What If” scenarios.

* Of course, if the client wants, we can always book another two or three days of our time helping them on-site with Step 1.


The result of this longer, more comprehensive process is:

  • A nearly point-by-point check of the facility (and their Process Safety program) against common RAGAGEP from a HAZARD perspective rather than a compliance one.
  • A much better understanding of the “What If” scenario questions when we get to them after the checklists.
  • Cleaner, more systemic recommendations that point to specific hazards and the RAGAGEP that most effectively addresses them.
  • At the end of the PHA process, facility team members have a much clearer understanding of where the requirements and recommendations are coming from.

You can learn more about our PHA offerings here. Email or call us today to have RC&E assist you with all your PSM/RM Program needs! [email protected]    (888) 357-COOL (2665)

The 2020 Christmas Update

Merry Christmas to our Ammonia Refrigeration Process Safety community!


Well, this year has been interesting, eh? The hits keep coming it seems, and it was no different to those of us in the Process Safety field. Behind the scenes, we’ve been working on a fairly major set of improvements to the PSM system. Originally scheduled for August, we’ve finally managed to push it across the finish line just in time for the Holidays!

Significant improvements were made to the core of the system (The SOPs and ITPMRs) through an unprecedented amount of end-user feedback. Remember, this system relies on the feedback of operators, technicians, service personnel, and Process Safety professionals to improve.

All updated documents have the 122520 date-code, but here’s a run-down:

  • Minor updates to definitions file
  • All element written plans:
    • Where it was appropriate, did a little harmonization with the newest IIAR Process Safety Management & Risk Management Program templates. (There isn’t really anything they cover we don’t, but there are some places we harmonized the phrasing where we cover the same ground)
    • Ensured all element Written Plans refer to the ROSOP QA – Document Quality Control section in the Document Management
    • Minor editing / formatting improvements
  • Minor change to Operator Training element to ensure that Initial Training on Incident Investigation includes a review of recent and routinely recurring incidents.
  • Improvements to the II element written plan’s “Incident Investigation Process Flowchart”
  • SOPs
    • Minor changes to the Implementation Policy: Review and Annual Certification to harmonize with the IIAR guidance
    • Annual SOP Certification letter improved to correlate with the SOP element Written Plan more closely
    • The SOP element Written Plan Implementation Policy: SOP Authoring / Generation section now provides “Best Practices” standard language for warnings, step comments, step instructions, etc.
    • ALL SOP Templates now:
      • Use the “Best Practices” language.
      • Include better language tying them to the ITPMRs
      • Reference ROSOP-PPE in the Safety considerations section
      • Additional Equipment Considerations added to harmonize with the IIAR guidance
    • ROSOP PPE slightly improved with reference to LEO
    • ROSOP LOTO improved with improved language from end-users
    • Minor updates to ROSOP QA – Document Quality Control section.
    • ROSOP LEO streamlined and simplified with a good amount of end-user feedback
    • New ROSOP ITPM based on significant end-user operator input and feedback (See MI section below)
  • MI / ITPMRs
    • All ITPMRs now provided as PDF forms as well as Word documents
    • All ITPMRs have improved references including to the new ROSOP ITPM
    • All ITPMRs now have a space to record task hours
    • All frequency ITPMRs are now in a single document. For example, previously we would have a 30-day, 90-day, and 365-day ITPMR for condensers. Now we have a single ITPMR for condensers with all the items and you simply use the applicable sections. This allowed each step in the ITPMRs to have its own unique step code. This is important because….
    • A new SOP was created called ROSOP ITPM which includes additional information for less-skilled operators and technicians. This new ROSOP also is used as a repository of best-practices and collected knowledge from field operators. Relevant guidance from applicable IIAR standards was also included directly in the SOP where we thought it useful to those performing the MI work. A group of contractor service technicians and end-user operators contributed to the creation of this SOP and We FULLY expect this SOP to grow and improve as we get even more field use and operator feedback.


To implement:

  • Written Plans: Follow the Implementation Policy: Managing Procedure / Document Changes. These should be straight-forward.
  • Definitions file: Replace with the new one
    1. For the new PPE and LOTO templates, either adopt them as-is or incorporate their changes to your existing PPE & LEO SOPs
    2. For all your equipment SOPs, consider updating them to the new language during your next scheduled revision / team review.
    3. For the NEW ROSOP-ITPM and PSSRs see the MI section below
  • MI: Replace the existing ITPMRs with the new ones, providing training that when the CMMS (or other scheduling system) calls for a frequency based ITPMR, just use the equipment specific ITPMR and fill it out to the appropriate frequency.
  • Provide training on the new ROSOP ITPM. Please collect feedback for improvements so we can all improve its performance.

How to respond to a Compliance Audit Report

Both PSM and RMP require a 3-year audit to “verify that the procedures and practices developed under the standard are adequate and are being followed.” While it is not required, this Compliance Audit is traditionally done through a 3rd party. A common failing I see in this element is end-users not understanding what to do with the Compliance Audit once they’ve received it. What follows are my thoughts on best-practices once you’ve received the Compliance Audit report.

  • Verify the Report
  • Certify the Report
  • Address the Findings / Recommendations
    1. Assess validity
    2. Decide on a solution to address valid recommendations
    3. Implement the solution including any needed interim solutions
    4. Document the resolution as closed


Verify the Report

You will want to ensure the report meets the requirements of the PSM/RMP rules as well as your internal Compliance Audit element Written Plan. First thing to do is to read through the report and any findings / recommendations to familiarize yourself with it. Your report may look different than the ones I deliver, but mine have five main parts:

  • An introduction letter describing the audit methodology and the report’s format
  • Closing meeting notes discussing highlights of the report and next steps.
  • An Audit Certification Page (discussed in the next section)
  • Statement of Qualifications: Qualifications of Company and PHA Facilitator / Compliance Auditor, Conflict of Interest Statement & Disclosure. This is basically a written answer to common “Who did this audit and why should we trust them” questions.
  • Compliance Audit worksheets & Findings / Recommendations

Once you understand the format of the report, decide if it met the goals of a Compliance Audit. I use the 3-levels of compliance as my performance basis.

Once you’ve established that the Compliance Audit report meets this performance basis, make sure it is:

  • Complete
  • Free of any copy-paste errors
  • Lacking any blank spaces / questions

If you have any questions or concerns, work with your auditor to address them at this stage, because once we go to the next step, this report is “set in stone.”


Certify the Report

Both PSM and RMP require that the employer/owner/operator certify the Compliance Audit report. I include a letter to be dated and signed. This step is often missed but it’s a very simple thing. You are not certifying that the report is 100% accurate, found every single thing wrong, etc. All you are certifying is that “you have evaluated compliance…to verify that the procedures and practices developed under the standard are adequate and are being followed.” In some sense, you’re really certifying that this collection of documents is your Compliance Audit, that you have received it, and that you believe it to be accurate.


Address the Findings /Recommendations

Each non-compliance finding will require some sort of action on your part. To assist in this endeavor, I personally rate the findings on a 4-level scale.

A simpler explanation of that rating system might be:

Green: All Good.

Yellow: It’s good, but there might be a better way.

Orange: This is wrong and can get you fined bur probably won’t get anyone hurt in the short-term.

Red: This is wrong and can get someone hurt or even killed.

Below is the flowchart from our model PSM/RMP program on dealing with recommendations. Please see this longer post on the subject for more information. Properly Addressing PSM / RMP Findings & Recommendations

Recommendations will be considered “addressed” when a plan has been put in place to address them. In some cases, a recommendation will not be accepted. OSHA considers an employer to have resolved recommendations when the employer has either adopted the recommendations or justifiably declined to do so. According to OSHA, an employer can justifiably decline to adopt a recommendation where it can document that:

  • The recommendation contains material factual errors;
  • The recommendation is not necessary to protect the health of employees or contractors, the public or the environment;
  • An alternative measure would provide a sufficient level of protection; or,
  • The recommendation is not feasible.

Whether accepting or rejecting a recommendation, it is important that you document your reasoning for doing so and any progress you are making, or have made. In our system we rely on an Implementation Policy called “Resolution of Recommendation” to do this. Below is an example of a recommendation that was tracked to resolution. Note that since it is now complete, they have shaded it green.

Conclusion: While it’s time consuming and labor-intensive, dealing with Compliance Audit recommendations is a fairly straight-forward task. As always, feel free to Contact Us if you have any questions, and check out our Compliance Audit section if you would like us to perform your next Compliance Audit.

Note: Nearly everything in this article is equally true for reports and recommendations from PHA’s, independent Mechanical Integrity Audits, etc.

« Older posts